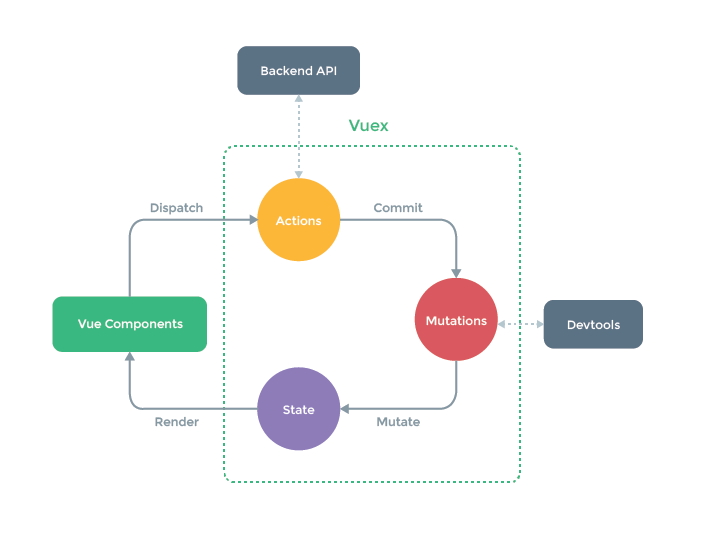
主题
vuex
工作原理

准备
引包
shellnpm install vuex --save在 vue 实例中注册(在
main.js)jsimport store from './store' new Vue({ el: '#app', store,//使用store template: '<App/>', components: { App } })创建一个
Storejsimport Vue from 'vue' import vuex from 'vuex' Vue.use(vuex); export default new vuex.Store({ state: {} })
分组管理 ——
modules
创建一个子 Store(创建 demoStore.js)
jsexport default { state: { show: false } }添加到主仓库中(创建 store.js)
jsimport demoStore from './demoStore.js' export default new vuex.Store({ modules: { demo: demoStore, other: otherStore,//其他store } })引入子 Store,要多加一个
键名
$store.state.demo.show
state
简写:
mapStatejsimport { mapState } from 'vuex' computed: { ...mapState({ show: state => state.demo.show }) } // 调用:this.show
getters —— 计算属性
定义
jsexport default { state: { //state show: false }, getters: { // 函数名在整个仓库中(包括其他子仓库)应该是唯一的 /** state: 上面这个 state getter: 整个 getter rootState: 整个大仓库 */ not_show(state, getter, rootState){ return !state.show } } }引用
jsthis.$store.getters.not_show简写
jsimport { mapGetters } from 'vuex' computed: { ...mapGetters(['not_show']) } // 调用:this.not_show
同样有缓存特性
mutations —— 同步操作
state 的改变应该在 mutations 中实现
定义
jsexport default { state: { show: false }, mutations: { // 函数名在整个仓库中(包括其他子仓库)应该是唯一的 switch_dialog(state) { // 这里的 state 对应着上面这个 state state.show = state.show ? false : true } } }触发
jsthis.$store.commit('switch_dialog')简写
jsimport { mapMutations } from 'vuex' methods: { ...mapMutations(['switch_dialog']) } // 调用 this.switch_dialog()
actions —— 异步操作、触发多个 mutations
异步操作必须在 actions 中进行
定义
jsexport default { state: { show:false }, mutations: { switch_dialog(state) { state.show = state.show ? false : true } }, actions: { // 函数名在整个仓库中(包括其他子仓库)应该是唯一的 switch_dialog_action(context) { // 这里的 context 和我们使用的 $store 拥有相同的对象和方法 context.commit('switch_dialog') } } }触发
jsthis.$store.dispatch('switch_dialog_action')调用
jsimport { mapActions } from 'vuex' methods: { ...mapActions(['switch_dialog_action']) } // 调用 this.switch_dialog()
actions 和 mutations 的区别
- action 中处理
异步,mutation 不可以- action 提交的是 mutation,而
不是直接变更状态。- mutation 一般是做
原子操作,而 action 可以整合多个 mutation
